Posts

Showing posts from September, 2018

14 Popup Menu

Image
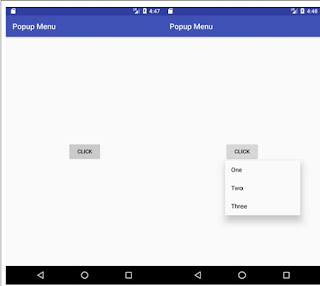
Algorithm: Step 1) Create a new Android Studio Project named as popupmenu. Step 2) Goto Project Structure and open the activity_main.xml file. Step 3) Create menu Android resource Directory and inside menu folder popup menu resource file. Step 4) open menu resource file and create the list of items you want to display in popup menu as options. Step 5) implement PopupMenu.OnMenuItemClickListener Interface to MainActivity class and Implement the following methods in the MainActivity class. public void showPopup(View view) {    /* user defined method by using android:onClick=”showPopup” in  activity_main.xml file.*/ //code } @Override public boolean onMenuItemClick(MenuItem item) { //code return false; } Step 7) Run the application from the menu bar select Run and Click on Run App option. Activity_main.xml

13 Context Menu

Image
Algorithm: Step 1) Create a new Android Studio Project Step 2)Goto Project Structure and open activity_main.xml file Step 3) Create menu Android resource Directory and inside menu folder create menu resource file. Step 4) open menu resource file and create a list of items you want to display in the context menu as options. Step 5) Implement the following methods @Override public void onCreateContextMenu(ContextMenu menu, View v, ContextMenu.ContextMenuInfo menuInfo) { //code } @Override public boolean onContextItemSelected(MenuItem item){ } Step 6) Run the application from the menu bar select Run and Click on Run App option. activity_main.xml <?xml version = "1.0" encoding = "utf-8" ?> <android.support.constraint.ConstraintLayout xmlns:android = "h t tp://schemas.android.com/apk/res/android " xmlns:app = "

12 OPTION MENU

Image
Algorithm: Step 1) Create a new Android Studio Project Step 2)Goto Project Structure and open activity_main.xml file Step 3) Create menu Android resource Directory and inside menu folder create menu resource file. Step 4) open menu resource file and create the list of items you want to display an options menu as options. Step 5) Implement the following methods @Override public boolean onCreateOptionsMenu(Menu menu) { // Inflate the menu; this adds items to the action bar if it is present. getMenuInflater().inflate(R.menu.menu_main, menu); return true ; } @Override public boolean onOptionsItemSelected(MenuItem item) { //code return super .onOptionsItemSelected(item); } } Step 6) Run the application from the menu bar select Run and Click on Run App option. Program: Activity_main.xml <?xml version = "1.0" encoding = "utf-8" ?> &

11 Scroll View

Image
Algorithm: Step 1) Create a new Android Studio Project Step 2) Goto Project Structure and open activity_main.xml file Step 3) Remove the default layout i.e Constraint layout and create Scroll View by using tag or drag and drop from the palette. Step 4) Follow the hierarchy structure < RelativeLayout> <LinearLayout> <HorizontalScrollView> <LinearLayout> //create 8 to 10 Buttons </LinearLayout> </HorizontalScrollView> </LinearLayout> </RelativeLayout> ScrollView can take only one children, so you can add LinearLayout or RelativeLayout/ Step 4) Step 5) Run the application from the menu bar select Run and Click on Run App option. Program: Activity_main.xml <?xml version = "1.0" encoding = "utf-8" ?> <RelativeLayout xmlns:android = "htt p ://schemas.android.com/apk/res/android " android:layout_width = "fill_parent" android:layo